Airbrushing is optional! Once I hit success, I couldn’t resist making these cookies my annual Pride Month dessert.
And proud is certainly how I feel when I think about them. Alas, many failed batches ensued:


Food Wasted, or Lessons Learned?
As long as my trials are enjoyable on some level, I try to eat, reimagine, or gift them; with these, however, I turned to the trash can more than once telling myself, “It’s not wasting if I learned something…”
right?
Believing what I tell myself is…not the focus of this blog. And in any case, it’s hard to justify experimentation given the price of groceries! So when I hit success, I celebrated with some color.


Vegan Black and White Cookies
Description
This is project baking. You have been warned.
❤️
You will likely have leftover icing. However...Do not halve the icing measurements!
Working with less than the written amounts makes the perfect consistency elusive. Store leftover icing in separate airtight containers at room temperature for 5-7 days while you gather yourself to make more cookies.
Of course, you may double the cake cookie measurements, but take your attention span for icing into account. (As written, this recipe yields 24-30 small or 12-15 large cookies.)
Ingredients
Cake Cookie
White Icing
Black Icing
Instructions
CAKE COOKIE
-
Plan 2-3 days before desired serving time. (Icing should set overnight.)
-
Bring plant-based butter to room temperature. Then, preheat oven to 350°F/180°C and line baking sheets with silicone or parchment.
-
Combine soy or almond milk and vinegar. In a separate vessel, whisk together Bob's Red Mill Egg Replacer and 2 Tbsp (30 mL/g) water. Set both mixtures aside.
Adding an acid like apple cider vinegar to soy or almond milk will create a vegan buttermilk. Be sure to use soy or almond; other plant-based milks will not curdle (thicken) and thus create a runny batter. -
Sift and whisk together flour, baking powder, baking soda, and salt (if necessary). Set aside.
-
With an electric mixer at high speed, cream "butter" and sugar. Then, beat-in "buttermilk" and "egg" mixtures (from Step 2) as well as both extracts.
-
At low speed, incorporate dry ingredients until a uniform texture is reached.
This texture will be thinner than a typical cookie dough, but thicker than a typical cake batter. -
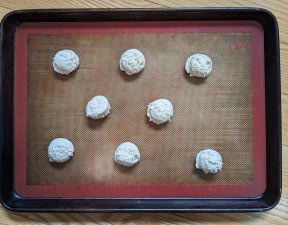
If using a cookie scoop, evenly stagger 8 mounds on a prepared baking sheet; ice cream scoop, 4.
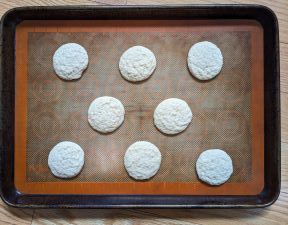
These cookies spread considerably! -
Bake small cookies 10 minutes; large, 15-18. Cool for length of baking time, then transfer flat-side-up to a wire rack. Continue until all dough/batter is gone.
WHITE ICING
-
Sift powdered sugar.
-
Add corn syrup, (clear) vanilla extract, and 1 Tbsp non-dairy milk.
-
Using a fork, whisk to create a uniformly dry, lumpy dough ball.
-
Add 1 tsp (5 mL/g) more "milk", then thoroughly whisk again. Repeat just until icing loosens to a spreadable consistency.
These icings should be thick! I typically use 1 Tbsp + 2 tsp (25 mL/g) "milk" total. -
Carefully spread onto half of each cookie before moving onto black icing.
These icings are also somewhat self-leveling. In other words, they offer some forgiveness for unevenness. -
Optional
If wishing to decorate, allow white icing to set 8-10 hours or overnight first. Move onto making black icing after decorating.
BLACK ICING
-
Sift together powdered sugar and cocoa.
WHITE ICING notes apply. -
Add corn syrup, vanilla extract, and 1 1/2 Tbsp (22.5 mL/g) non-dairy milk.
-
Using a fork, whisk to create a uniformly dry, lumpy dough ball.
-
Add 1 tsp (5 mL/g) more "milk", then thoroughly whisk again. Repeat just until icing loosens to a spreadable consistency.
I typically use 1 1/2 Tbsp + 2 tsp (32.5 mL/g) "milk" total. -
Carefully spread onto other half of each cookie.
-
Finishing
For classic black and white cookie textures, allow final product to dry overnight. Admittedly, however, I can't wait any longer than these take to make sometimes...nom nom!
Note
Read my product review of vegan butters to learn why I recommend Country Crock Plant Butter Sticks with Olive Oil...
and my review of egg replacers to learn why I recommend Bob's Red Mill.


